Apple Chips — October 25, 2015

Apple Chips


Ah… It’s my favorite time of year! The leaves are turning and the weather is cooling down. I can snuggle in a blanket and sip coffee all day with sweating my brains out! Also, the oven will no longer warm my apartment to unbearable temperatures. I am a happy girl when fall comes around! Not to mention Thanksgiving and Christmas being right around the corner. AHHH!!! I can’t take all of this wonderfulness!!!!!!

Fall is my favorite season. I feel very strongly about it. In case you didn’t deduce that from the previous paragraph. 🙂

With all things fall also comes school for me. That means being busy all the time and living off of sandwiches/frozen food.  All the while munching on very unhealthy snacks and studying.  Not a stellar diet. In order to incorporate a healthier snack and keep things interesting (meaning not boring, raw fruit) I sometimes make these Apple Chips.

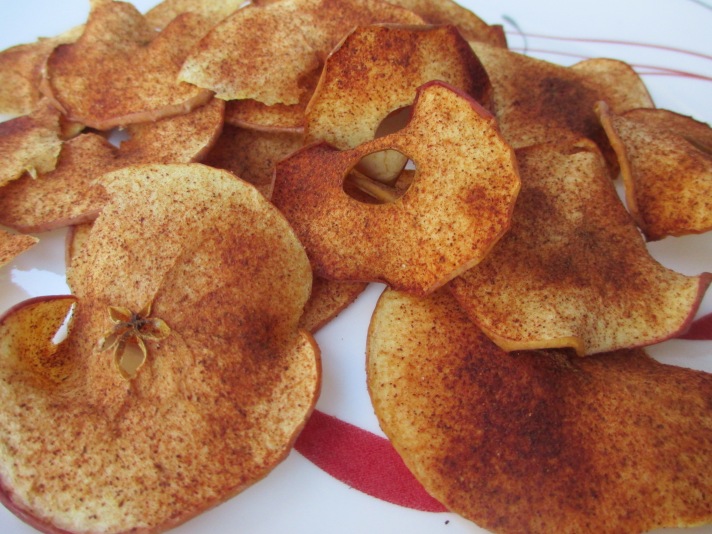
I’m not even a huge fan of apples and I love these things.  They are crunchy, sweet, and a fruit–an A+ snack in my book. Aside from them tasting good, while they are baking your house/apartment/area of living will smell divine. Apples and cinnamon. Perfection.

You will want start off by preheating your oven to 250°F (120°C) and lightly greasing a cookie sheet.

Now mix up your cinnamon and sugar. I usually us a 1:3 or 1:4 ratio (for every one part cinnamon three parts sugar). 1:3 will give you a pretty cinnamony mixture.  If you don’t like cinnamon that much, or just can’t handle it, mix it to your preference. What I have come to find, with this recipe, is the apples tend to have a bit of natural sweetness, A stronger mixture helps to keep the chips from becoming overwhelmingly sweet. This is all personal preference, do as you please. Set the cinnamon sugar aside (I made extra so I could keep some for toast).Cinnamon Sugar

Get out a cutting board, an apple, and a very sharp knife. In my experience one apple covers one cookie sheet. Be sure to use a sharp knife–the sharper your knife the easier it will be to get thin slices. We want thin slices! Paper thin. If your slices are too thick they wont dry out properly and the chips will be chewy. I always end up slicing a couple too thick, so I sprinkle a little cinnamon sugar on them and have a snack as I slice. No shame in my game!

slices

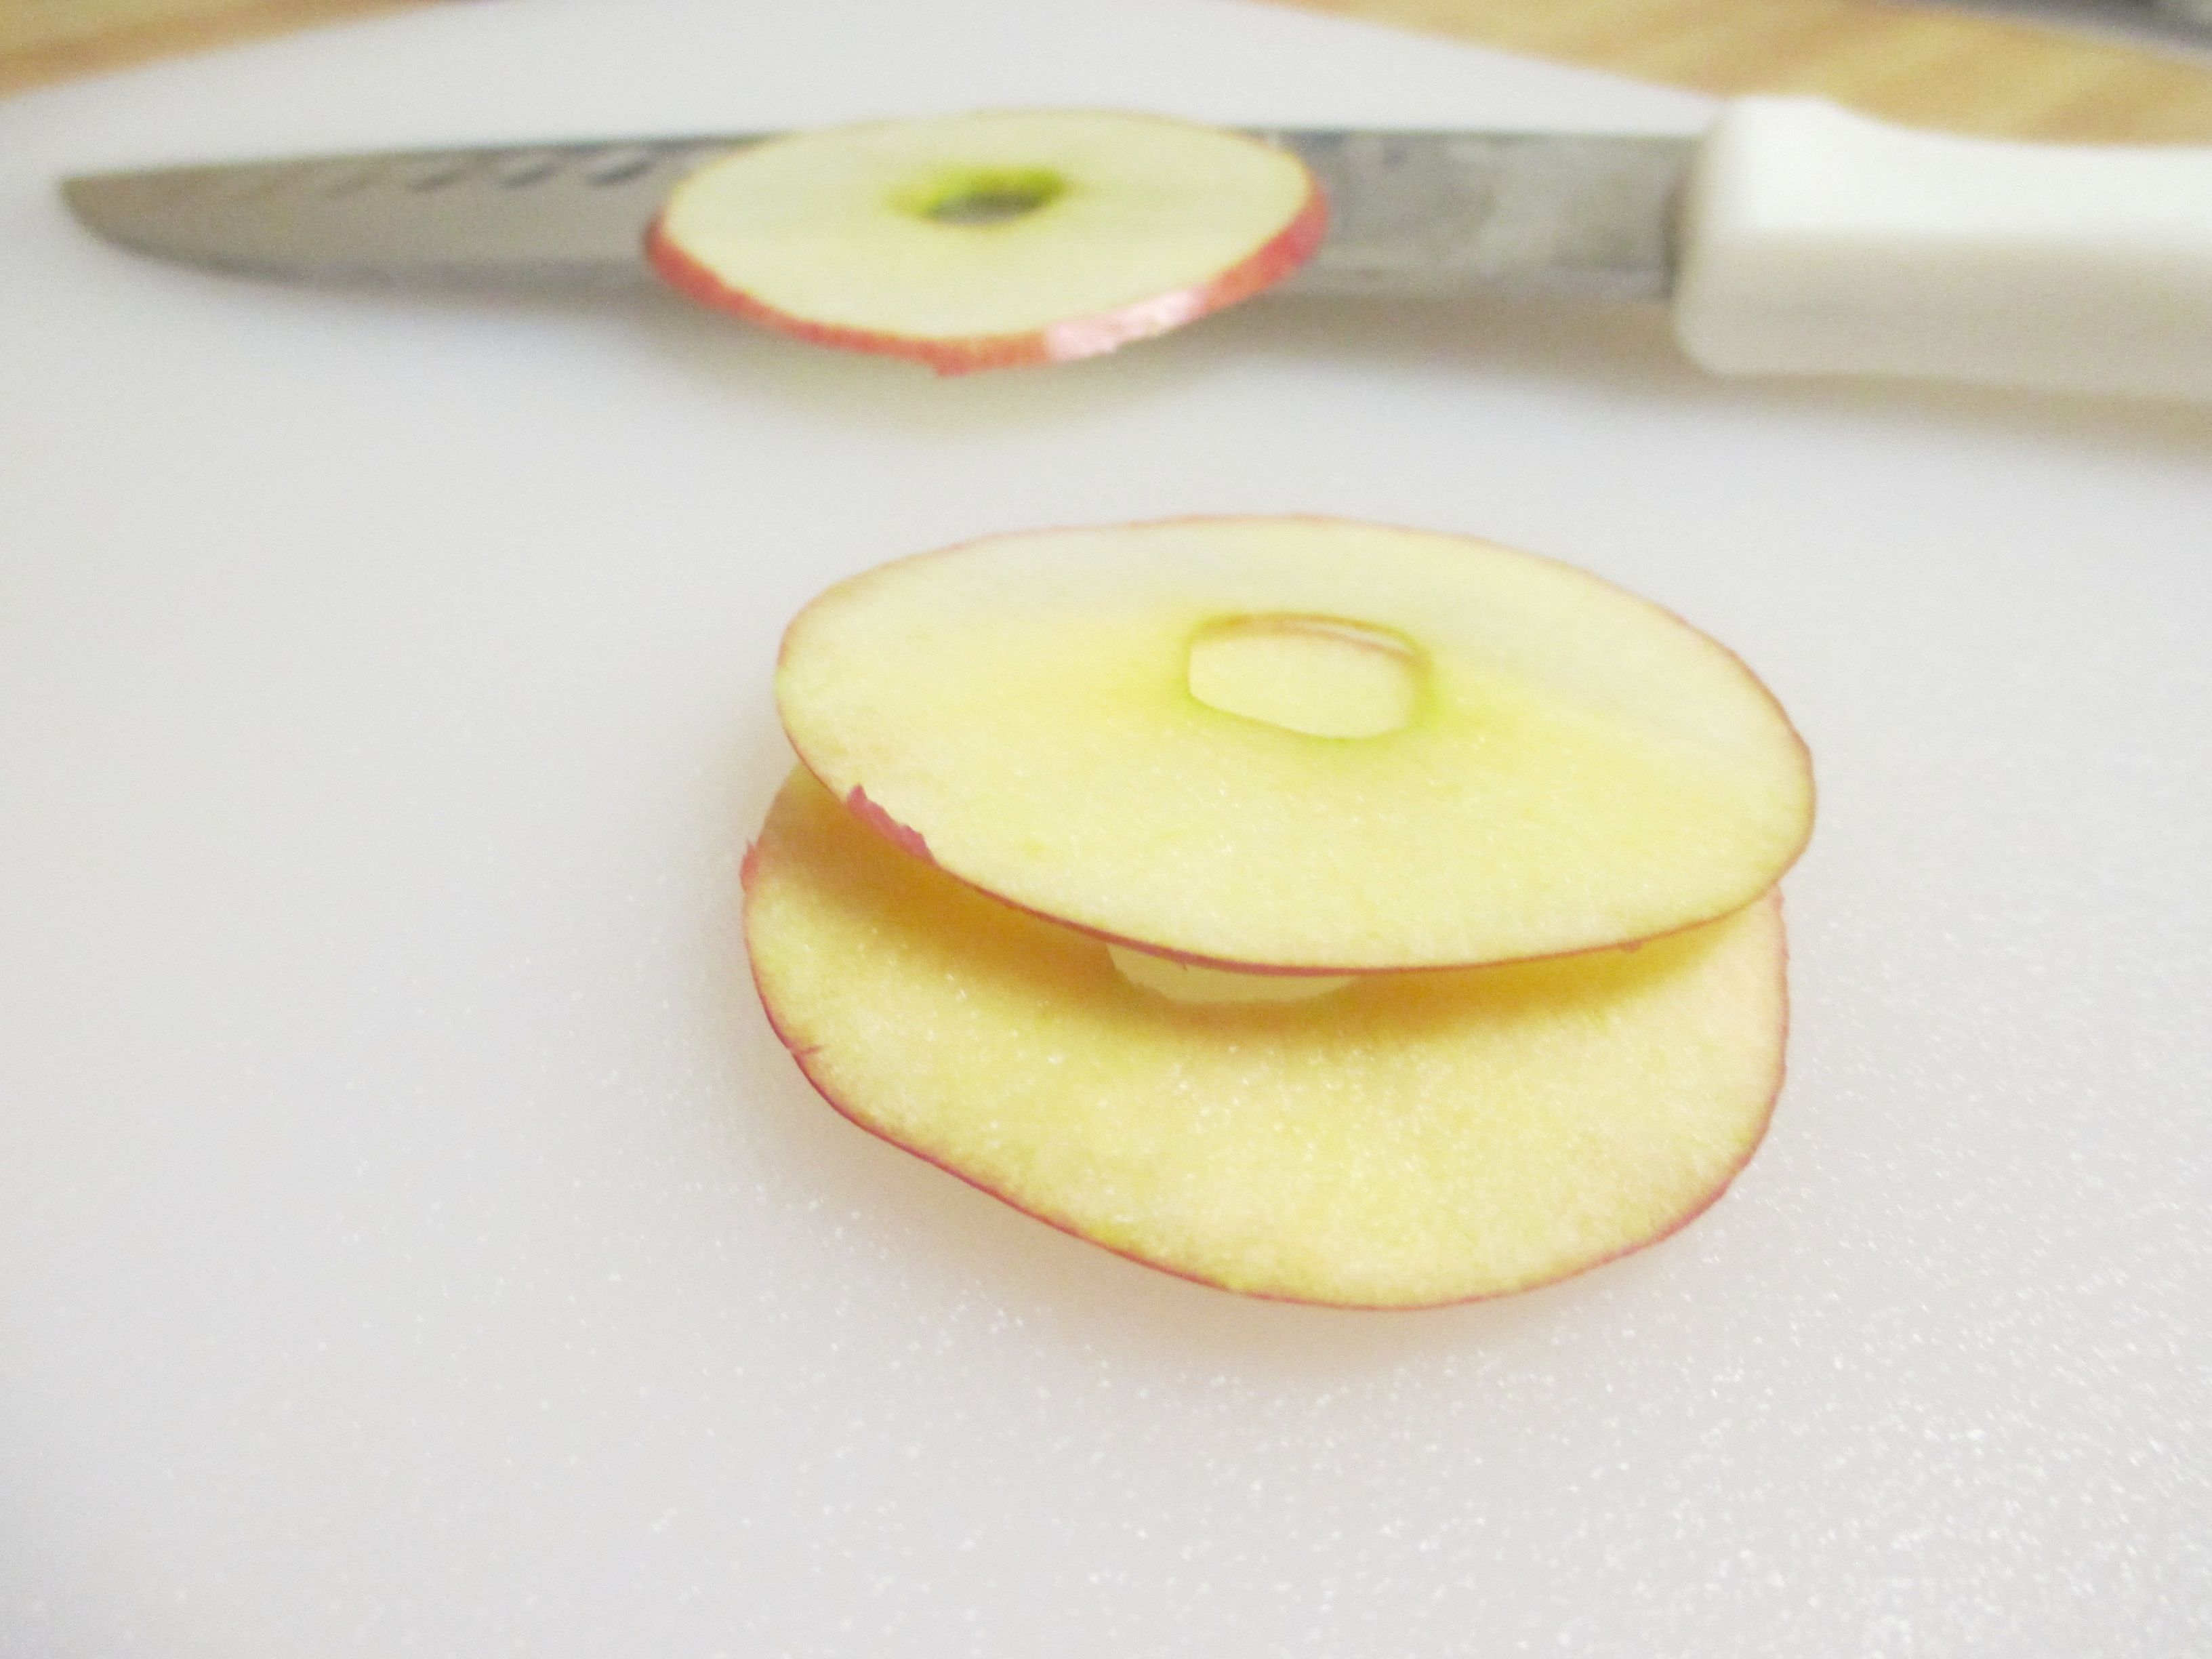
Lay the slices in a single layer on your baking sheet.  You can lay them close together as they will shrink in the oven, but be sure they aren’t overlapping.  Yes…I see I have a few overlapping here. Just trust me, it works better if they aren’t laying on top of each other. On pan

Sprinkle cinnamon sugar over the top of each slice and pop them in the oven! Let them bake for 30 minutes. Remove the slices from the oven and flip them over. Put them back in the oven for another 30 minutes.  If you cut your slices a bit thicker it will take a little longer. If they are thinner you will want to remove them a little sooner. Use your best judgement.  They may seem slightly pliable, but as the cool they will crisp up (a little not a lot).

If you have any questions leave a comment below! Happy Fall everyone!

Here is a printable of the recipe: Apple Chips

APPLE CHIPS

Prep: 10 minutes     Baking: 1 hour

Ingredients:

  • 1 apple
  • 1 tsp cinnamon
  • 3 tsp sugar

Steps:

  1. Preheat oven to 250°F. Lightly grease a baking sheet.
  2. Rinse and pat the apple dry. Very thinly slice the apple using a sharp knife. Line the slices on the baking sheet in a single layer. Be sure they are not overlapping. Sprinkle the slices with cinnamon sugar.
  3. Bake for 30 minutes, flip them over and bake for another 30 minutes. The slices should be crispy. Let cool and keep in a sealed container.
Banana Bread — July 4, 2015

Banana Bread

Bananas are a staple food for me.  I have one almost every day whether it is for breakfast or a snack.  They are always on my weekly grocery list.  My husband on the other hand will not touch them. He refuses to eat almost anything that deals with bananas. ALMOST anything. He likes this banana bread (with chocolate chips).

This bread does not have an overwhelming banana flavor.  There is a balance that satisfies the banana lover in me and does not disgust the banana hater in my husband.

Another win for the loaf is its amazing crust.  It always comes out of the oven a deep golden brown color, crispy and caramelized. The perfect texture and warm sugary flavor. Banana Bread

I always add chocolate chips to the recipe because my husband and I are both chocolate fanatics. You can add nuts if you prefer or just keep it as pure banana bread.  Whatever you do, this sweet, soft bread will not disappoint.

*Warning: while baking this bread it will make your kitchen smell wonderful.  Resist the urge to remove it from the oven and devour the entire thing immediately. It comes out of the pan better after it has cooled for about 10 minutes. Or you could be like me and start eating straight out of the pan while it is hot! 😉

Banana Bread

Prep time: 15 min        Baking Time: 1 hr          Baking Temperature: 325°F

2 cup Flour

1 1/4 cup Sugar

1 tsp Baking SodaBanana Bread 3

1/2 tsp Salt

2 Rips Bananas, mashed

2 Eggs

1/2 cup Vegetable Oil

1/4 cup Buttermilk

1 tsp Vanilla Extract

Nuts or Chocolate Chips if you desire

  1. Preheat oven to 325°F and prepare your bread pan by greasing the bottom, corners, and sides very well.
  2. Mix together the dry ingredients in a large mixing bowl. Stir in the nuts or chips at this point if you are adding them. Set this mixture aside.
  3. Mash the bananas in a small mixing bowl. Continue mashing them until most of the chunks are gone (the riper your bananas are the easier this will be). Add rest of your wet ingredients and whisk together until it is well combined.
  4. Form a well in your dry ingredients and pour in the wet ingredients.  Gently stir everything together until it is just combined. Do not over mix or your bread will have a tougher texture.
  5. Pour the batter into your well greased bread pan, and bake for one hour. A knife or toothpick inserted into the middle of the loaf should come out mostly clean if the bread is done. Bake for an additional 10 minutes if it isn’t quite finished. Let the loaf cool in the pan for at least ten minutes before removing.

My First Attempt at Pie Crust — June 22, 2015

My First Attempt at Pie Crust

For many years I have made pies with premade, refrigerated pie dough. All I had to do was unroll the crust into a pie dish. Boom it was done!

While the premade dough did its job, (and causesd me very little pain while doing so) I have never quite been completely please with the flavor. It was fine, but no better than average.

Last week I decided it was time for me to begin the adventure of perfecting my pie crust making skills.

For my first attempt I used King Arthur Flour’s Traditional American Pie Crust recipe. Before we continue on with the account of my adventure let me say that the crust tasted good. Anything that went wrong was completely me, not the recipe. I will definitely be attempting it again.

And so my crust making adventure began…

I mixed the dry ingredients together. I worked the shortening in with my fingers, to create a nice crumbly mixture. At this point I’m thinking pie crusts can’t be that difficult. I don’t know what all the fuss is about!

Processed with VSCOcam

Then came the adding of the ice water. I read the instructions. They said to add ice water one tablespoon at a time until the dough sticks together when pressed, but isn’t sticky. I added one…two tablespoons of water and my dough was already to this point. That is half of the lowest recommended amount in the recipe.

So, I was confused, but decided to stop there as I did not want to deal with a messy, sticky dough.

Processed with VSCOcam

I proceeded to divide the dough in half and roll it out as instructed. This went well until I needed to lift it from the counter… It stuck. I had forgotten to continue sprinkling flour under the dough while rolling it out.

Scrap the first half and start over with the second (good thing I was only making a one crust pie). Rolling the second piece out went a little better. I managed to us a spatula and a lot of patience to peal the raw crust off of the counter with only a couple of tears.

Deep breath… Time to transfer to the pie plate. I folded the dough in half,gingerly. Then, proceeded to gently pick it up and place it in the pie plate. Once in the pie plate, I unfolded it and began to work it into place. It soon became apparent that even though I had rolled it to the correct thickness the diameter was not large enough. Sigh.

Processed with VSCOcam

Instead of starting the entire process again or overworking the dough, I decided to continue on with the pie making, accepting my losses.

I then proceeded to prepare and bake The Pioneer Woman’s Pecan Pie. It turned out delicious albeit not very pretty! The filling was extremely rich and had a nice pecan crust on top (just as a pecan pie should). Although the crust was skimpy, it had a nice texture and flavor.

Here’s to delicious, ugly pies. Let me know of any tricks or tips you might have for making pie crust. I need all the help I can get!

Candied Bacon — June 14, 2015

Candied Bacon

I saw something about candied bacon once and have been curious ever since.  Today I finally gave it a try! It was very simple and the results were amazing.  The saltiness of the bacon remained while the sweetness of the brown sugar added another layer of flavor.

Here are the steps:

First, preheat your oven to 400°F.  Line a baking sheet with tinfoil (this will make cleanup much easier). Lay the bacon strips on your foil-lined baking sheet. Make sure they aren’t touching. I fit about ten strips of bacon on mine.

Next, sprinkle each piece with a bit of brown sugar. I filled a small dish with some brown sugar and just used my fingers to sprinkle it over the bacon.

Brown Sugar Brown sugar on the bacon

Now you can place your bacon into the oven.  I cooked my for 21 minutes, but I had fairly thick slices. Keep an eye on your bacon. I would start checking it periodically around 15 minutes.  The thickness of your slices will have a big impact on the cooking time.

Comment below with any questions you have!
Candied Bacon

Candied Bacon

Preheat oven to 400°F. Line a baking sheet with tinfoil (for easier cleanup). Lay slices of bacon on the cookie sheet, being sure they are not overlapping.  Sprinkle each piece of bacon with brown sugar. Bake in the oven for 15-25 minutes. The baking time will vary with the thickness of the slices.

Strawberry Muffins — June 9, 2015

Strawberry Muffins

I can’t get enough strawberries right now! They are in season, cheap, and delicious. When trying to think of a different way to consume them, I came up with strawberry muffins. These muffins are light, fluffy, and moist. Quite simple too!

Moist Strawberry Muffins

The first thing you will want to do is preheat your oven to 475°F.  You will be baking your muffins at 375°F, but starting your oven 100°F hotter than the baking temperature helps to create those desired peaks on your muffins.

Next, melt the butter.  Do this at the beginning so it has time to cool. This is so when you beat the egg into the butter won’t cook!

After you have melted the butter and set it aside to cool, measure the flour, sugar, baking powder, and salt into a large mixing bowl. Stir them until they are well combined.

Dry Ingredients

Now whisk your milk and eggs into the melted butter (or margarine).

Wet Ingredients

Here is another trick! To keep pieces of fruit from sinking to the bottom of your baked goods, stir them in with the dry ingredients. This way they get a coating of powder around the outside that sort of sticks it in place.

Stir those strawberry chunks into the dry ingredients until they are all coated.

Mix strawberries into dry ingredients Strawberries in dry ingredients

Form a well in the dry ingredients and fill it with the wet ingredients.

Wet in dry well

This part is important! Stir together the wet and dry ingredients until they are just combined. Never over-mix your muffins. They will turn out tough and undesirable. Your batter will be chunky, but that is alright! Resist the urge to continue stirring!

Fill each muffin cup 2/3 full and pop them in the oven! Drop the oven temperature from 475°F to 375°F. Bake for 15 minutes, or until the tops turn a nice golden brown and spring back when you touch them. Remove the muffins from the pan to cool.

Please comment with any questions you have about this recipe. If you give it a try, share an image with me on Instagram or Facebook. I would love to see!

Delicious Strawberry Muffins

Strawberry Muffins

Makes: 12 muffins      Time: 30 minutes

  • 1 cup Chopped Strawberries
  • 2 cups Flour
  • 2/3 cup Sugar
  • 2 Tbsp Baking Powder
  • 1/2 tsp Salt
  • 2/3 cup Milk
  • 1/2 cup (1 stick)Butter or Margarine
  •  2 Eggs
  1. Preheat the oven to 475°F. Line a muffin tin with paper  liners or grease the muffin tin well.
  2. In a small bowl melt the butter or margarine. Set aside to cool.
  3. In a medium bowl, mix together the dry ingredients.
  4. Whisk the milk and eggs into the melted butter.
  5. Gently stir the chopped strawberries into the dry ingredients.
  6. Pour the wet ingredients into the dry ingredients. Mix together until just combined. DO NOT over-mix. The batter will be lumpy.
  7. Fill each muffin cup 2/3 full. Put the muffins in the oven and drop the temperature to 375°F. Bake for 15 minutes or until the tops turn a nice golden-brown and spring back when you touch them.

Peanut Butter Oatmeal Chocolate Chip Cookies — June 2, 2015

Peanut Butter Oatmeal Chocolate Chip Cookies

Milk and warm cookies

I have a bonus post for you this week! They are my favorite cookies. Give them a try and let me know how it goes!

These cookies were always a huge hit in my house when I was growing up. Every time a batch was baked the cookies would disappear in a flash!

The ingredients are added in three sets of three (except the chocolate chips which are mixed in at the end). Once the cookies are spooned onto the cookie sheet they must be flattened because they do not spread much. I use the bottom of a glass and dip it in sugar to keep the cookies from sticking to it too much.

Flatten before bakine flatten with a glass

Here is the recipe so you can see for yourself just how great they are! I hope you enjoy! I would love to hear any questions or opinions in the comments section below! Happy baking!

Peanut Butter Oatmeal Chocolate Chip Cookie

 Peanut Butter Oatmeal Chocolate Chip Cookies

  • 1 1/2 cups packed brown sugar
  • 1 cup creamy peanut butter
  • 3/4 cup margarine (softened)
  • 1/3 cup water
  • 1 egg
  • 1 tsp vanilla extract
  • 3 cups quick cook oats
  • 1 1/2 cups flour
  • 1/2 tsp baking soda
  • 2 cups semi-sweet chocolate chips
  1. Preheat the oven to 350°F. Cream together the first three ingredients until they are fluffy.
  2. Add in the next three ingredients (water, egg, and vanilla) and mix well.
  3. Measure the oats, flour, and baking soda into the bowl and mix until everything is combined. Fold in the chocolate chips.
  4. Scoop round spoonfuls onto a greased cookie sheet.  Using the bottom of a glass dipped in sugar flatten the cookie a little. Bake for 10 minutes, or until they just start turning golden brown.  Let them cool for a few minutes before removing from the cookie sheet.  They are extremely gooey when warm.
Follow The Sugar Tin!

Pinterest

Facebook

Instagram

Brownie in a Mug — June 1, 2015

Brownie in a Mug

Do you ever get a hankering for something sweet that just won’t go away, but you don’t have the time or patience to bake something fancy.  Here is a solution to that problem. Today I have for you a brownie in a mug that is simple, and super fast.  You can now have  a warm brownie in under two minutes! It gets even better–you only need three ingredients!

Water, oil, and brownie mix.  Can it get much simpler than that?

Water, oil, brownie mix

Dump the brownie mix into your mug. I used Betty Crocker chocolate chunk mix because who doesn’t want melted chocolate in their brownies?

brownie mix

Then, pour in your water…..

add the water

and your oil.

add the oil

MIX!

Pop the mug in the microwave for 1 minute…

And there is your brownie!

Texture

I keep the extra mix in an airtight bag for the next time I get a craving.

extra brownie mix

Now go make one! (It won’t take long)

Brownie in a Mug

Brownie

1/2 cup premade brownie mix

2 Tbsp water

1 Tbsp vegetable oil

Pour all three ingredients into a mug, mix well, and microwave for 1 minute. Enjoy!

Follow The Sugar Tin!

Pinterest

Facebook

Instagram